
One of the biggest drawbacks of FDM printing is the uneven surface of the part. Of course, these days the quality of 3D printers as well as filaments has improved a lot and the surface quality has improved a lot.
In this article, I intend to answer this question and teach you all the things I have tried or know so far. I try to share my experiences and things that no one has said before. Golden Tips. An important part of this article relies on acetone Polishing. Acetone is an industrial solvent that has a great effect on ABS. Basically ABS is much better for polishing than PLA. The first reason is the greater thermal resistance of ABS. When you start sanding and polishing, the printed piece gets hot and if it is made of PLA, it may deform. In addition, as the piece heats up, the chips become soft again and stick together.
The second reason is that Aston is ineffective on PLA. You must have searched and tested a lot in this hope so far. But it is useless. PLA also has a special solvent but is only used for gluing parts and minor work.
So far, there are several ways to polish the surface of the printed parts.
2. Acetone hot acetone vapor Bath
3. Acetone ultrasonic mist
4. Sinking in acetone
5. Epoxy based filler resins
6. tumbling
7. Primer and paint
8. Sanding and manual polishing
9. Peristaltic pump
1. Cold acetone vapor
Aston cold steam bath is one of the best methods so far. The advantages of this method are:
First low consumption of Aston
Second, less respiratory and toxic fumes
Third . The destruction of the piece is less than that of a hot Aston bath
Fourth, more uniform polishing
The first drawback of acetone baths is the need for a enclosed compartment, and it is difficult to find a compartment for large parts.
Secondly, acetone vapor is apparently heavier than air and is more concentrated at the bottom of the chamber. This causes the elephant's foot to form in the parts. As a result, the lower parts of the part become more polished than needed and the upper parts remain intact. To solve this problem, it is recommended to use paper towels to increase the concentration of Aston vapor in the upper parts of the chamber.

The second way is to circulate the air inside the chamber by a low speed fan. But due to acetone corrosion, all plastic and electronic parts of the fan will be destroyed. Therefore, this must be done by means such as magnetic coupling and a metal fan. That is, he put a completely metal or PP plastic blade inside the chamber and rotated the blade from the outside of the chamber with a magnetic coupling. I have not tried this yet but I think this would be the best solution to have a very good Aston bath.
The next recommendation is to place the parts in the middle of the chamber, where the most uniform concentration of acetone vapor is. To do this, you can use hanging pieces or a resistant bed to put the pieces inside the chamber.
The third disadvantage of acetone vapor baths is the lack of complete control. Consider a part with areas that need more polishing due to support, overhang or other reasons, and other areas need less polishing due to high details. You will have no option to enforce the vapor on a certain area selectively. It purges around all over the part evenly.
In this case, either the fine details of the part must be removed or some areas may not be completely polished and the traces of the layers are visible. However, this also depends on your strategy and decision. I suggest per-processing and sanding the areas that need more polishing. Start polishing when all surfaces need polishing equally.
The fourth disadvantage of acetone vapor bath is that the whole part may not be polished. When you place the pieces on the tray of the chamber, you will prevent the acetone vapor from reaching the bottom surface of the part and it will remain completely intact. The only available solution is to hang the piece inside the chamber, which of course is not without problems. It is not possible to hang all pieces. Acetone gradually softens the ABS, and if the piece is hung from weak parts or thin walls, the piece will deform due to its own weight. This will also depend on your own strategy and decision. Of course, using a mesh tray can be very useful to polish all surfaces of the piece.
2. Acetone hot vapor bath
I have been using the acetone hot vapor bath for a long time because I believed that cold vapor would not work or would last more than eight hours. But when I tried the cold bath, I think it was completely superior. Regarding the advantages and disadvantages of this method, I must say that all the disadvantages of the previous method apply here as well. In addition, a hot vapor bath releases a much larger amount of vapor when the lid is opened and is more harmful to breathing and health.
In my opinion, this method is more dangerous because of the higher temperature and diffusion with acetone vapor pressure when the chamber is opened.
The important point is that in this method, due to the positive pressure inside the chamber, Aston vapor will have more penetration into the part. This may make the printed piece stronger. Although I did not try this, I can confirm it with a comparison that I have in mind. In a cold vapor bath, acetone penetrates much less and affects a little depth. Therefore, in the case of thin-walled parts, the hot vapor bath does more damage and deforms the part. My bottom line is: use the Cold vapor Bath.
3. Acetone ultrasonic vapor Bath
This is an interesting one. Making such a device has many challenges due to the corrosion of acetone. The idea is that acetone evaporates in a separate chamber with an ultrasonic mist maker, which is usually used for water, without heating, and the generated fume enters the main chamber and contacts the part.

A commercial model has also been made and it seems to work well. Although most of its components are plastic and it seems to degrade in the long run. It's worth to mention that not all plastics are sensitive to chemical solvents. Polypropylene is a great example.

The challenges of making this device are complete sealing and separation of vulnerable electronic and plastic parts from Aston. In addition, there is a need to create airflow in a closed circuit, which must also be resistant to Acetone. At the moment I am completely satisfied with cold vapor bath and my innovative peristaltic pump method, and I do not think I will try this method in the near future.
4. Drowning 3d printed part in acetone
If you read this article in its entirety and get here, you must have asked, instead of all the hassle and hassle, why not put the whole piece in solvent for a few seconds and that's it.
I had searched the internet a lot about this idea before, but I had not come up with any specific results. Until I tried it myself.
Positive answer! This method is excellent. You can easily pour the acetone into a container and hold the piece inside for a few seconds and you're done. But why this method is underrated. I will explain to you.
I do this in two ways. The first method is when the piece is small and completely sinks in a container with a small amount of solvent.
The second method is when the part is very large and between 500 and 1000 CC of acetone is required for complete sinking. This volume is neither economical nor recyclable and maintainable after polishing because it absorbs plastic deposits and becomes cloudy. It does not make sense to throw away all these chemicals.
As a result, I tried this. my method is to pour 50 to 100 CC of acetone into the container instead of 1000 cc. I put the piece inside and shake the container gently and periodically. This creates waves that continuously swallows and contacts the entire piece.

There is no need for the piece to sink completely, but for one or two minutes I continue shaking the container so that the whole piece gets wet and covered with solvent.
I polished a lot of parts this way. It is interesting to know that this way all the surfaces of the piece are completely polished in a short time, for example, two to three minutes.
5. Fillers
From now on, forget about Acetone and let me explain the other methods. Any material that is used as a filler, covers the surface of the piece and creates a uniform surface. Epoxy resin and paint are two examples. In the case of paint, primer paint should be used first.
The disadvantages of this method are the need to experiment and change the dimensions of the part. Drying of the cover layer clamps time.
6. tumbling
This is an old method for uniformly polishing usually small pieces of a range of materials, from metal to rocks. The part is placed inside a small barrel with abrasives. Abrasives are usually made of stone or metal, all of which have the same amount of abrasion, roughness and dimensions. The barrel in the tumbler begins to rotate, and the abrasive media and part collide for hours. Pour some water into the tumbler barrel to remove the ground powder from the piece and expose the new layers of the piece to media. Another method of tumbling is to use vibration. I was always looking for a useful and effective way to polish. That's why I made a tumbler that I will show in another project.
Tumbling takes a very long time. For example, for a small piece, it takes between 30 and 60 hours for a significant effect to be observed. The layers are still visible though. Polished surfaces also become rough. I did not try the vibrating tumbler but I guess it is not much faster than the rotating tumbler. It's important for me to do things in a short time. The tumbler has a lot of noise and has to work in a separate place. I should also add that when I used steel media for wear, the surface of the parts turned black and I think ceramic media was better. Ceramic media also has more wear than metal. At the moment, I am happy with other methods, especially the peristaltic pump, I will not developing this method, although I spent a lot of time on it.
7. Primer and paint
You need a lot of experience and patience. The paint coating is a little thick and can not easily fill the seams of the layers. You should also use one or more primer layers to stick the paint to the plastic piece. The problem with paint is that as much as it sits on the seams, it also highlights the layers and creates almost the same offset. The paint is of any kind and even from the best brands, and the coating must be applied carefully every time. The painted piece smells for a long time. However, using clear color gives a lot of beauty and shine to the piece. Also, clear color has more filling properties. However, there are many types of paints and I did not try them all. I think paint airbrush is one of the things I may give a chance one day.
One of the best colors is the Duplicolor brand, whose primer has a very good quality. Anyway, I told you the disadvantages of this method. My goal is to tell the disadvantages and unspoken points of each method. This does not mean that everything I said is not practical and full of objections.
8. Sanding and manual polishing
Sanding is common and well known. Change sand grit of your liking and apply a final wet sand for final glossy look. But it takes a lot of time and patience, especially on closed corners . To improve this method, I have developed a series of tools that make polishing very fast. However, in this method, the part must be prevented from overheating so that the surface is not damaged.
For good sanding and manual polishing, I got a Proxxon 28594 Pen Sander PS 13, 12 Volt. Which is really great for small pieces. In addition, two types of tools that I made myself and I will explain in another post.
You can also combine sanding with the previous method, namely primer and paint. That is, first apply one to three coats of primer and after complete drying, sand to get a much better result.
9. Other methods
If you think sandblast or shotblast can be used to polish printed parts, I want to save you time and say no. Sandblast has a lot of pressure and while the piece is very hot, it does not create a proper surface at all. There was a sandblast workshop in the city where I lived, so I gave sandblast guy a few samples of the printed pieces and tried them on.
Regarding chrome plating that is done on plastic, I must say that plating has a small filling property. One of the good things about Iran is that most of these services are very easily available and I was able to try both plating and sand blast, shot blast and bead blast. The result, however, is that neither is useful.
10. Peristaltic pump
An idea came to my mind while I was using the method of acetone drowning. If I could somehow wash the whole part with acetone, it would be as if I had completely submerged it in it. For this idea, a pump and an acetone tank are needed to continuously pump the solvent and I can pour it on the part.
The point is that I have to try to wet the whole piece at once and during one to three minutes that I am washing the piece, I do not skip anywhere and do not let it dry. This method is great because I can polish extra large parts in a very short time, and with a small amount of solvent.
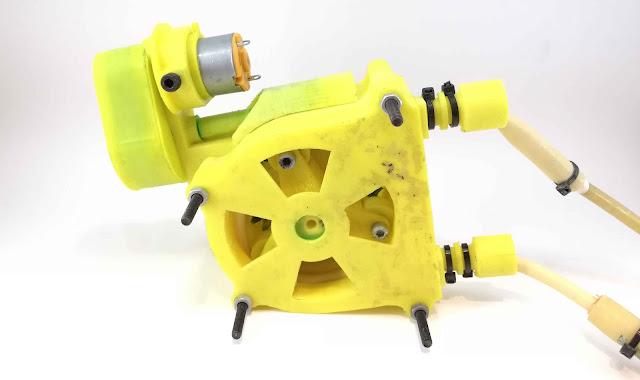
I will write a separate post about this.This is compact liquid pump and is fully resistant to Acetone. the liquid goes through a latex tube and after washing the part sheds to the tank again . Anyway, I learned a lot from this project and I have to publish it in a separate place.
But here I need to mention the cons & pros of this method. I have not seen anyone else to develop such technique until now.
Pros :
The first advantage of a peristaltic pump is the lower consumption of acetone compared to complete immersion of the part.
The second advantage of high speed in polishing parts. This method is quite suitable for polishing a large number of pieces.
The third advantage is the possibility of polishing any size of piece
Cons:
The first drawback of the peristaltic pump is the presence of white sediment and residue on the part. In vapor bath technique, acetone vapor is completely pure and affects the part without any additional substances. But this is not the same scenario in washing. If the part is not washed quickly, some surfaces get wet Insufficiently, produce white residues form and are hard to remove.
The third drawback is the need for a lot of skills. The polished quality sometimes does not match the shine and radiance of the acetone vapor bath. Of course, this will be solved with a little practice and timing correctly and quickly.
Conclusion
In this article, I tried to explain to you all the known techniques, plus the methods that I invented.I explain the negative points and shortcomings of the methods with more emphasis so that you can make better decisions.
Smooth and clean 3D printed parts are a long-standing human desire. But unfortunately, all available methods are destructive and cause errors in the dimensions of the piece or destroy some details. Another disadvantage is that most of these only work on ABS filament.
Of course, the ABS filament produced by my company has a good quality. In my opinion, this amazing polishing property of ABS is one of the important reasons why it will never go out of fashion and its fans are always there. All the photos you saw in this article were made with filament produced by my company under the FILABEST brand, and this makes a lot of sense to me.


No comments:
Post a Comment